

Le perle dorate Montessori: tutorial per costruirle in proprio con poca spesa, indicazioni didattiche generali e lezione in tre tempi per la presentazione del materiale ai bambini…

Con le perle dorate Montessori il bambino scopre l’aritmetica nell’ambito del Sistema Decimale:
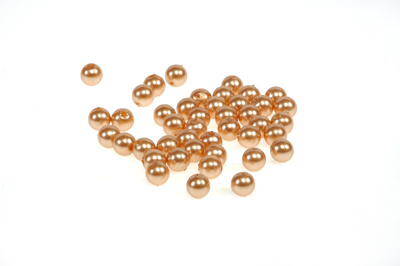
l’uno (unità) è un punto

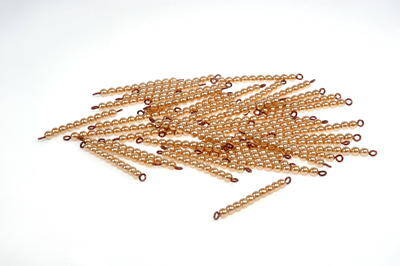
la decina è un allinearsi di dieci punti su una linea
il centinaio una successione di dieci linee (di dieci perle ciascuna) su di un quadrato pari a 100
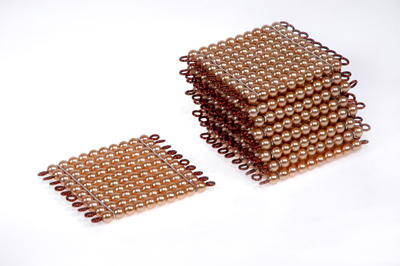
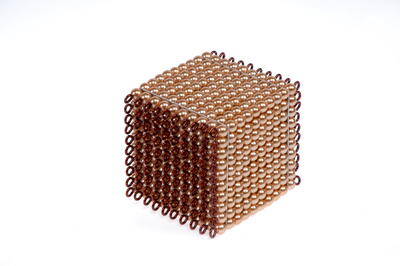
il migliaio è composto da dieci quadrati messi insieme che costituiscono un cubo di 1000, che è nuovamente un grosso punto
diecimila si forma mettendo uno accanto all’altro dieci cubi che danno come risultato nuovamente una lunga linea.
Per dare ai bambini la possibilità di occuparsi concretamente di grandi spazi numerici, insieme al materiale delle perle dorate Montessori vengono offerti loro, da subito, anche i simboli numerici per le unità, la decina, il centinaio ed il migliaio in forma di scheda stampata – download gratuiti qui:

I bambini mettono le cifre in relazione con il materiale concreto e imparano che hanno bisogno di soli dieci simboli: 0 1 2 3 4 5 6 7 8 9 , per potersi muovere e orientare nel gigantesco mondo dei numeri.
L’1 e lo 0 sono come una cornice per il tutto.

Hans Magnus Enzenberger lo ha raccontato in modo meraviglioso nel suo romanzo Il mago dei numeri:
“Sulla grande scala apparve un cinese in abiti di seta e prese posto sul trono d’oro.
-Chi è mai costui?- chiese Roberto.
-E’ l’inventore dello zero- sussurrò Teplotaxl.
-Allora è il più potente?-
-Il secondo-, disse il suo accompagnatore -il più potente di tutti abita là sopra, dove finisce la scala, nelle nuvole-
-Anche lui è un cinese?-
-Ah, se lo sapessi! Quello non l’abbiamo visto nemmeno una volta, ma noi tutti lo onoriamo. Egli è il capo di tutti i maghi dei numeri perchè ha inventato l’uno. Chissà, forse non è nemmeno un uomo, forse è una donna!-
Roberto era così impressionato che non aprì bocca per un pezzo. Intanto i servitori avevano iniziato a servire la cena.
-Ma queste sono tutte torte!- esclamò Roberto.
-Sss, non così forte, ragazzo mio. Qui noi mangiamo solo torte, perchè le torte sono rotonde, e il cerchio è la più completa di tutte le figure. Assaggia…-“
L’uno è l’inizio, la prima perla, cui seguono la seconda, la terza, la quarta, la quinta, la sesta, la settima, l’ottava, la nona e la decima.
Arrivati alla decima, si cambiano tutte le perle sciolte con una nuova unità: la decina o 10.
E si continua a contare, e per farlo abbiamo bisogno di altre nove decine; arriviamo al decimo bastoncino e siamo arrivati a 100.
ll bambino capisce in questo modo che ci spostiamo continuamente in una nuova unità; lo zero aiuta a immaginare quanto spazio i numeri si siano appena presi.
Si può intuire facilmente come la dimestichezza con tale materiale comunichi un profondo messaggio psicologico al bambino: egli sperimenta l’estensione dell’aritmetica, ma allo stesso modo può immaginare il proprio sviluppo: cominciando da un punto (l’ovulo) l’essere umano cresce e occupa sempre più posto.
Perle dorate Montessori: presentazione e tutorial
Costruire in proprio il materiale
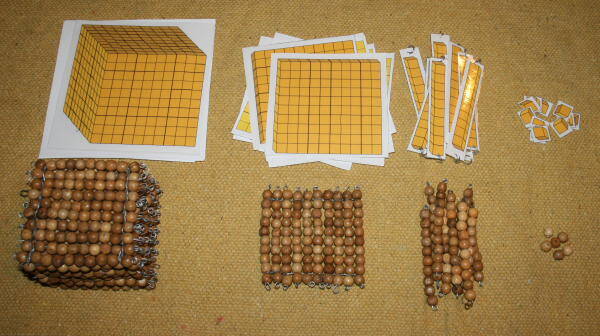
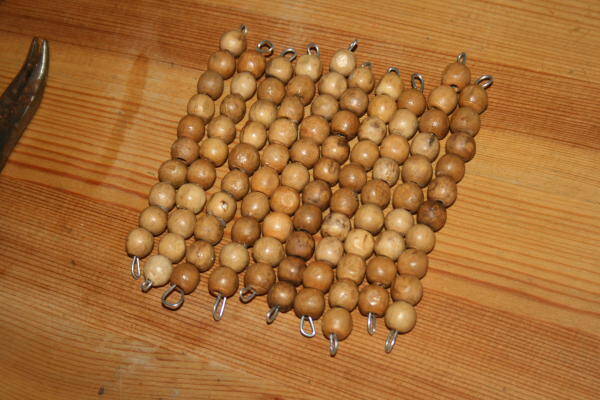
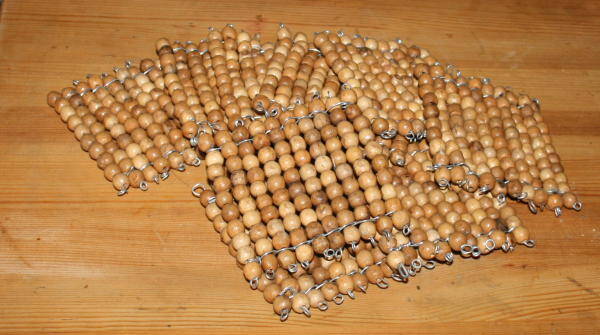
Ricapitolando, per materiale delle perle dorate intendiamo una dotazione di perline dorate tutte della stessa misura. Ce ne devono essere di sfuse per le unità e infilate in file di 10 per le decine, le centinaia e il migliaio.
Un’unità è una perlina (punto)
Una decina sono 10 perline infilate il linea verticale su un fil di ferro o uno stecchino (linea)
Un centinaio sono 10 file di decine disposte una a fianco all’altra (quadrato)
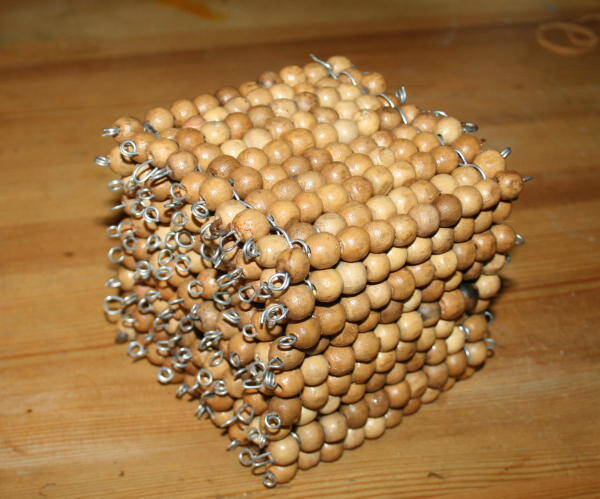
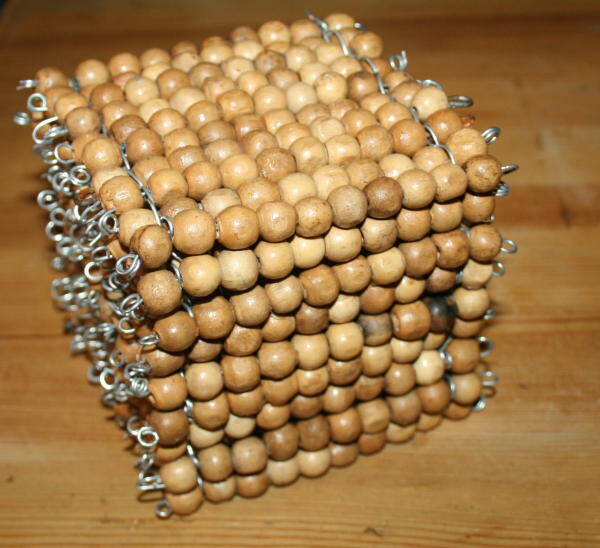
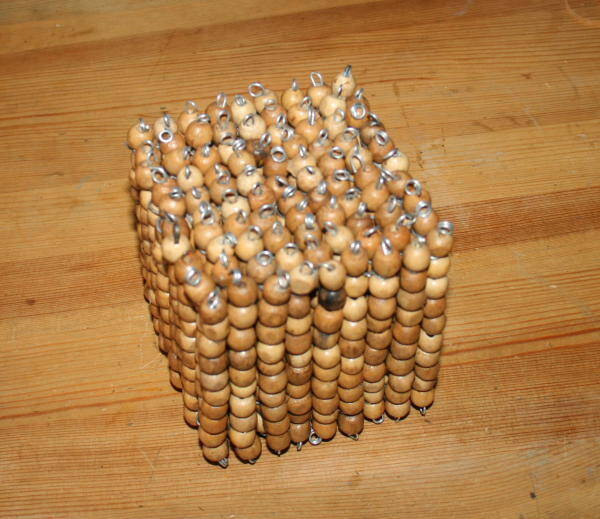
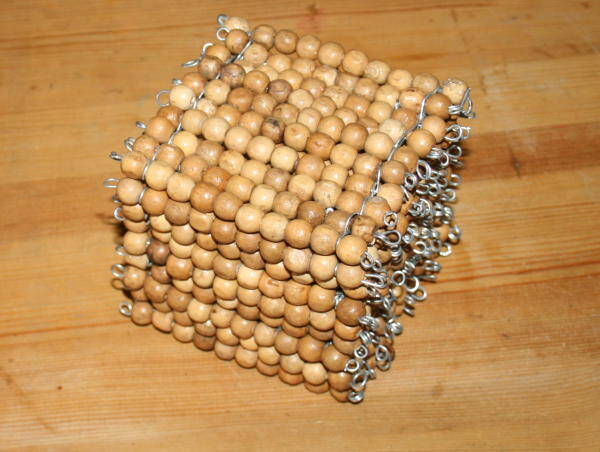
il migliaio è formato da dieci centinaia sistemate insieme a formare un cubo 10x10x10 (punto)
Questo modello punto / linea / punto / linea si ripete in tutte le numerazioni del sistema decimale.
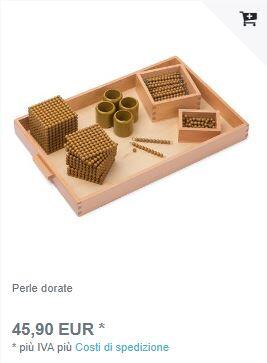
Il fornitore più economico che ho trovato offre questo materiale:
Ma prepararsi il materiale da sè è estremamente semplice, se non si è troppo perfezionisti (troppo montessoriani?) e se si coinvolgono nella costruzione del materiale i genitori.
Aggiungo, per chi pensa di non poter affrontare la costruzione del materiale, una versione stampabile:

che non ha sicuramente lo stesso valore dal punto di vista sensoriale, ma che può permettere di eseguire coi bambini una vasta gamma di esercizi sul sistema decimale:
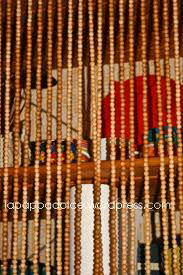
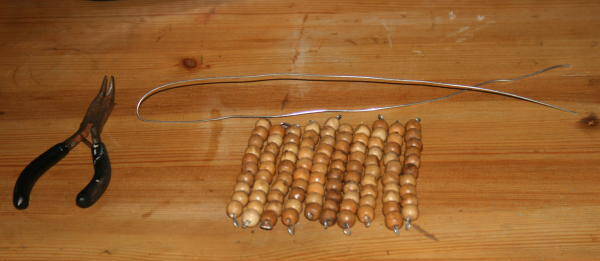
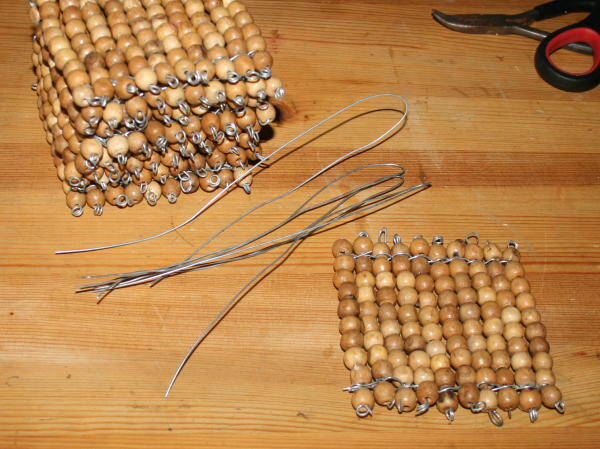
Io, per avere a disposizione una grande quantità di perle tutte uguali per costruire il materiale in proprio ho usato una vecchia tenda:

e ho fatto come mostrato nelle immagini seguenti. Il lavoro richiede sicuramente del tempo, ma ne vale la pena ed è molto semplice. L’unico consiglio è quello di scegliere un fil di ferro non troppo rigido…
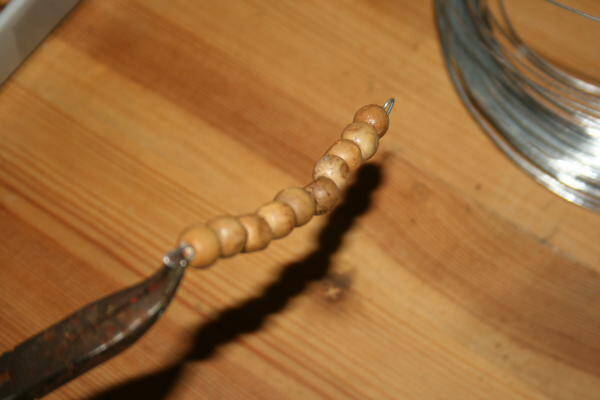
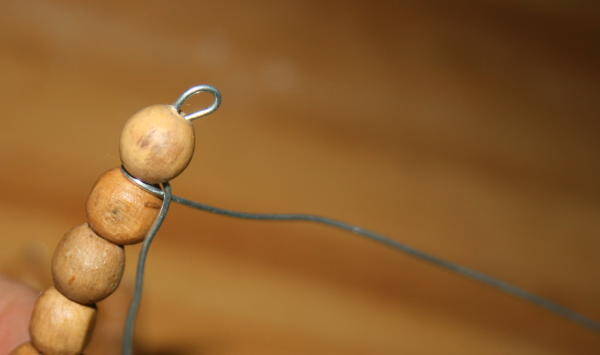
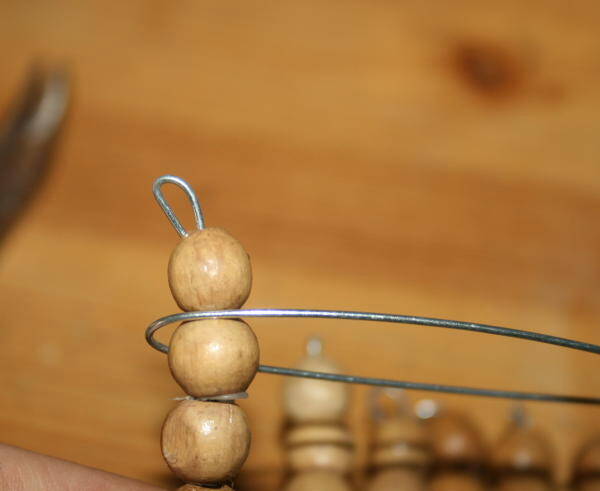
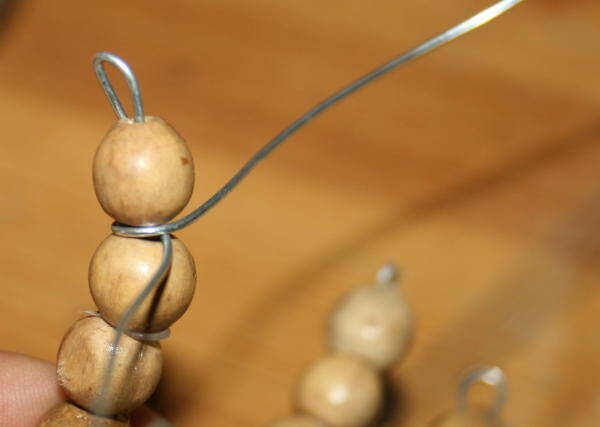
Barrette della decina:

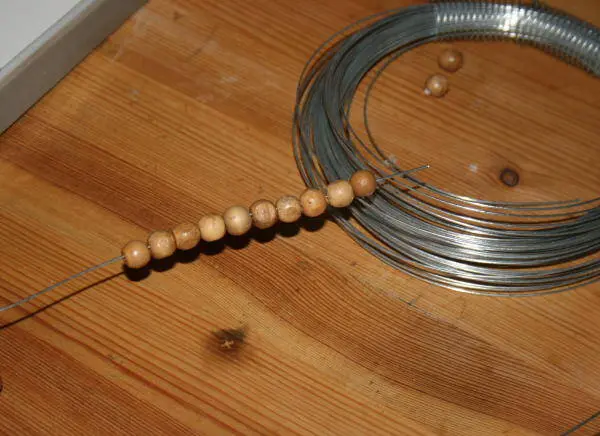
infilate dieci perline nel fil di ferro,

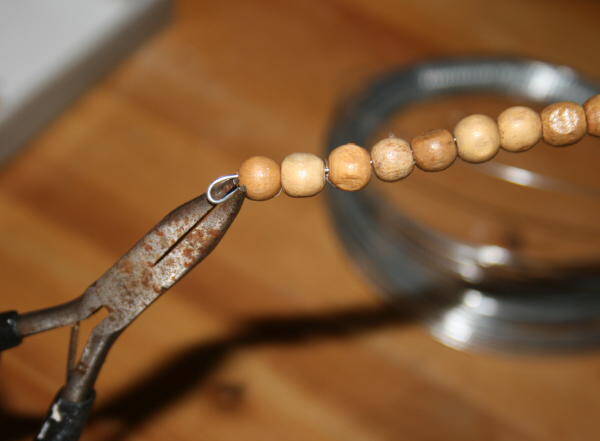
ripiegate il primo estremo

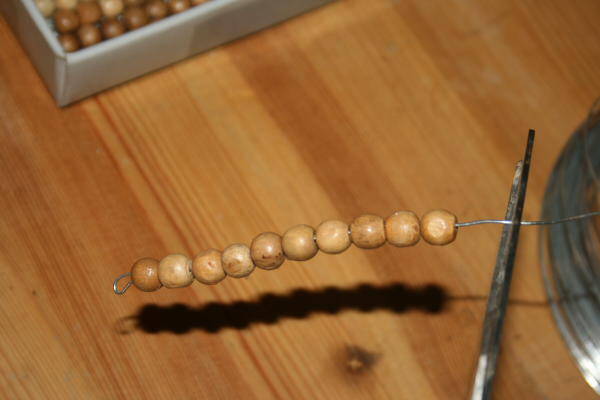
tagliate dall’altra parte e ripiegate:
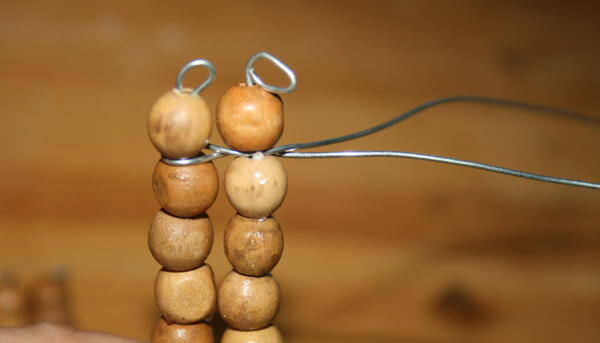
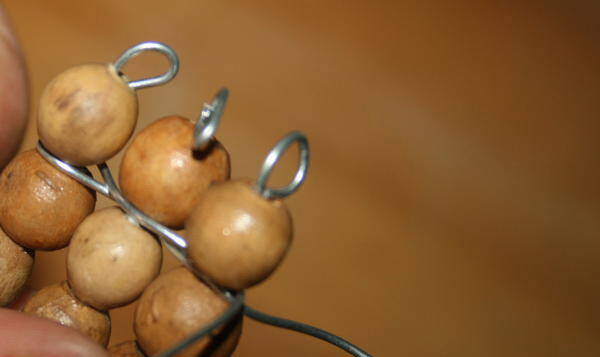
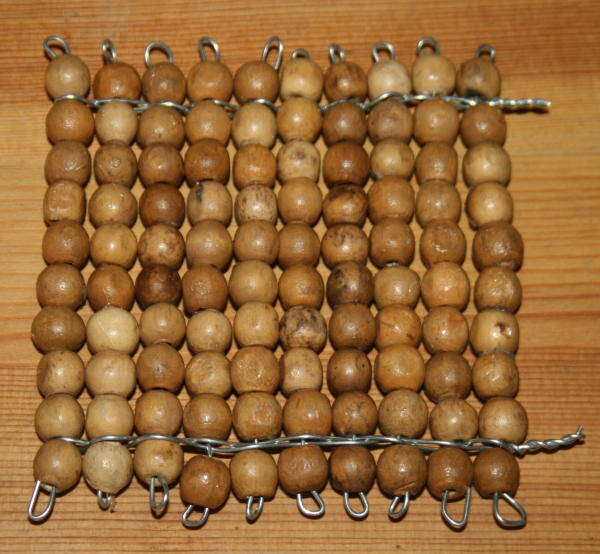
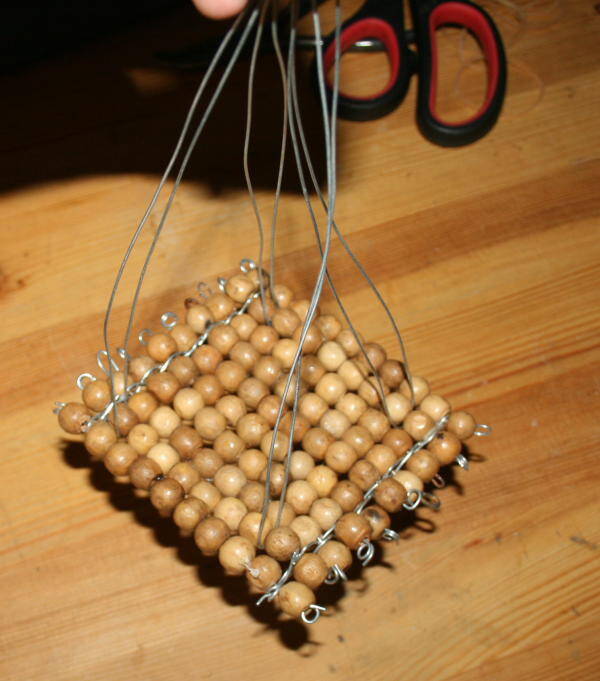
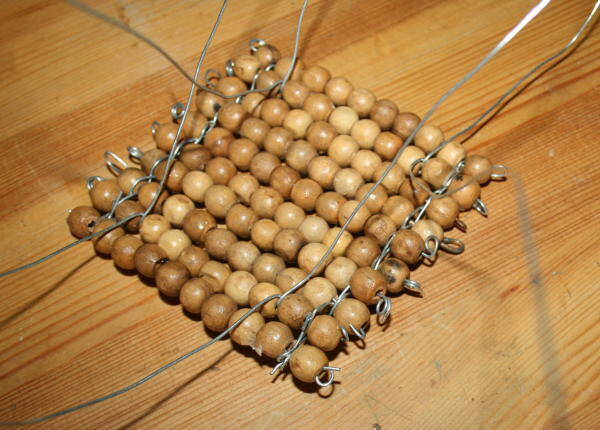
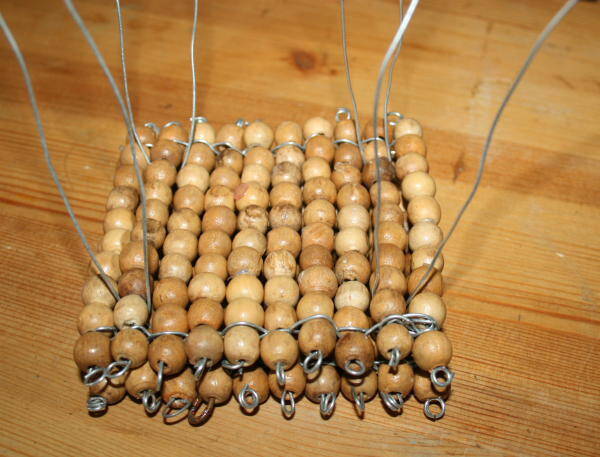
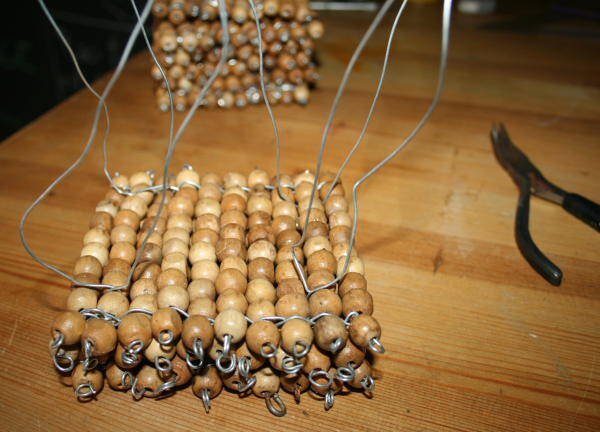
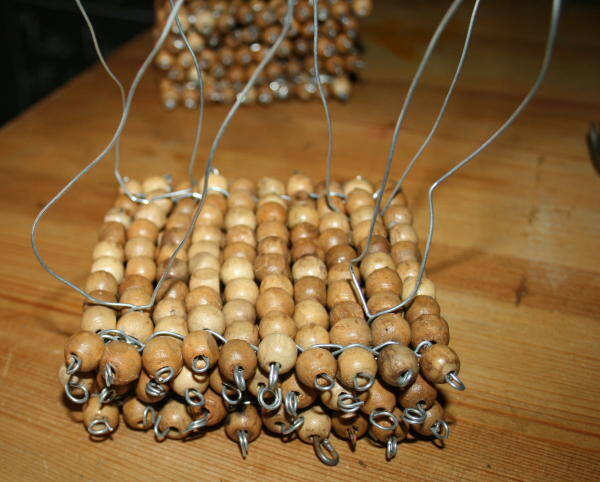
Quadrato del centinaio:
preparate 10 barrette della decina

tagliate un pezzo di fil di ferro e ripiegatelo a U, in modo che ripiegato risulti lungo circa il doppio del quadrato di perline

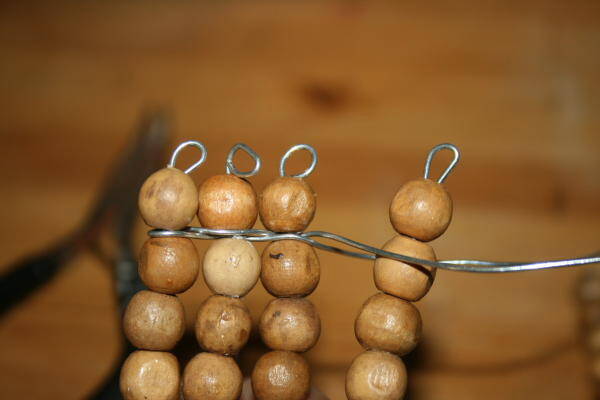
Inserite la curva della vostra U tra la prima e la seconda perlina della prima barretta e modellate come nell’immagine

avvicinate la seconda barretta e modellate nuovamente il fil di ferro, come fatto attorno alla prima barretta

procedete così per tutte le altre barrette

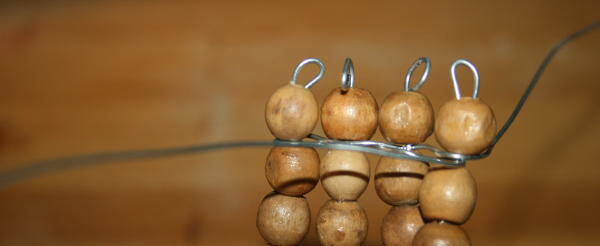

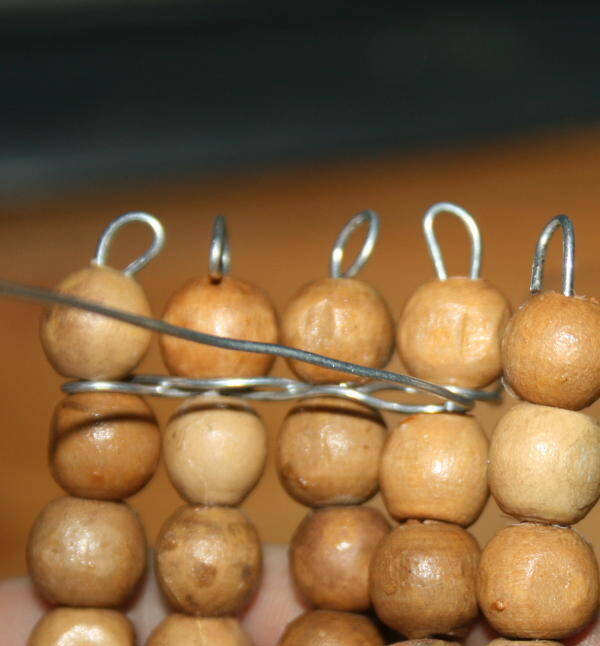

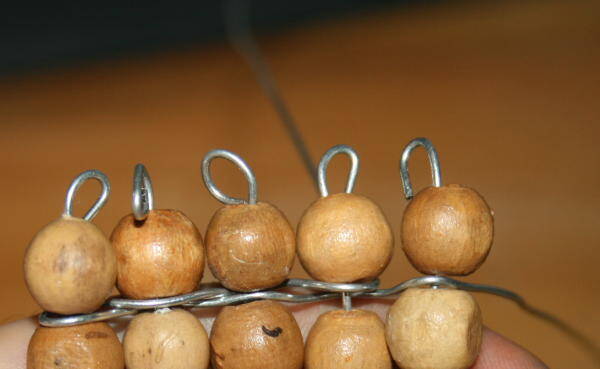

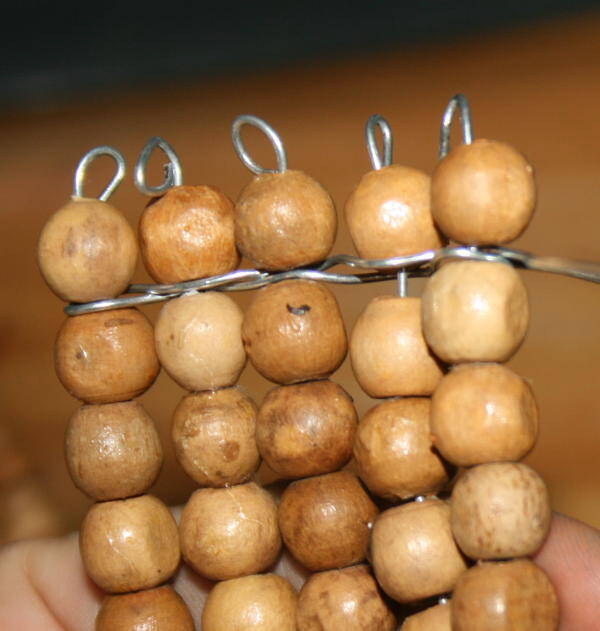
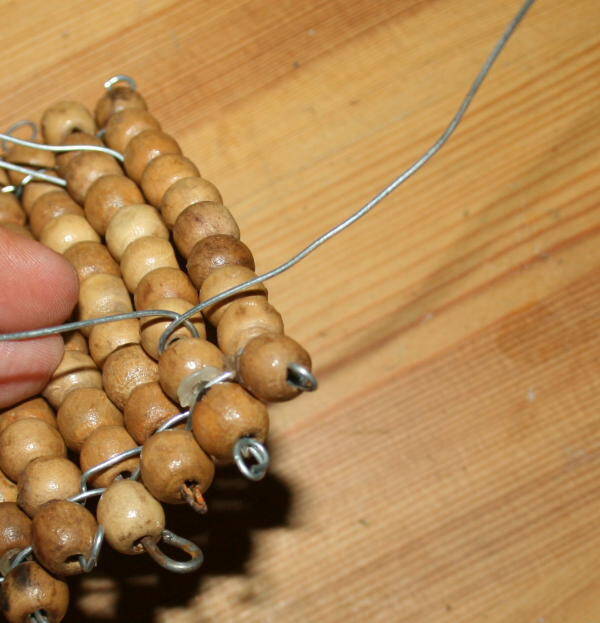
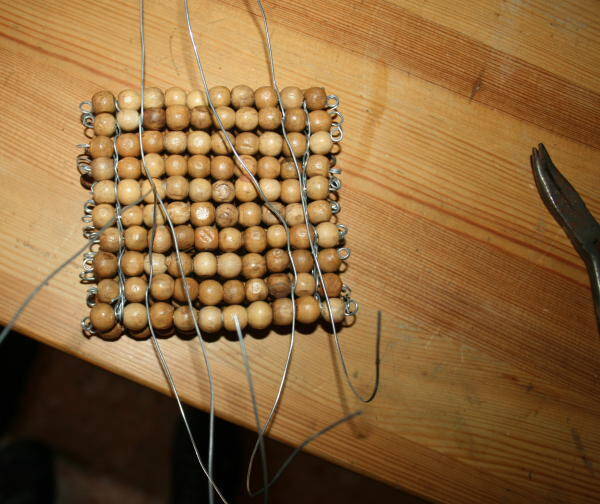
Ora tagliate una seconda U di fil di ferro e procedete allo stesso modo a fissare il secondo lato del vostro quadrato del cento


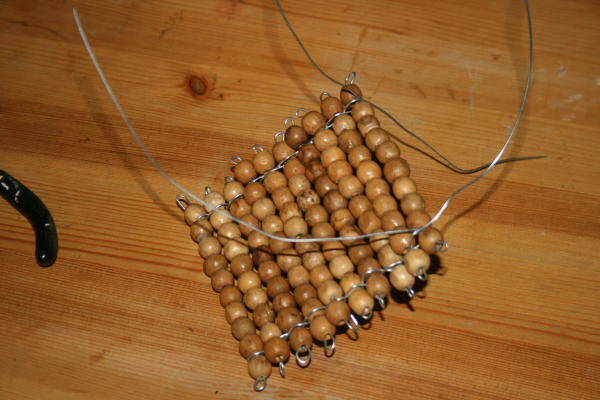
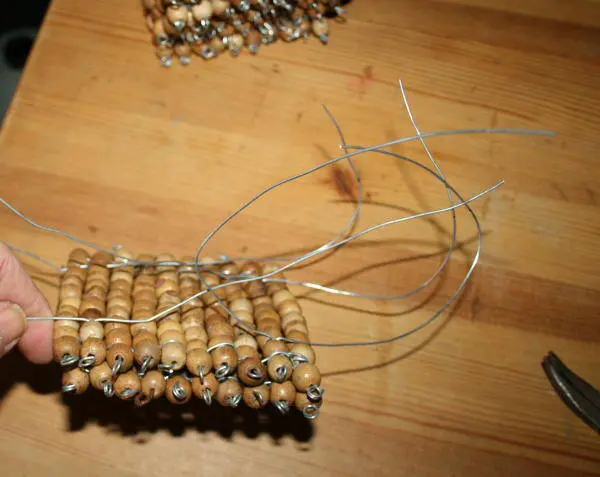
alla fine attorcigliate il fil di ferro rimasto
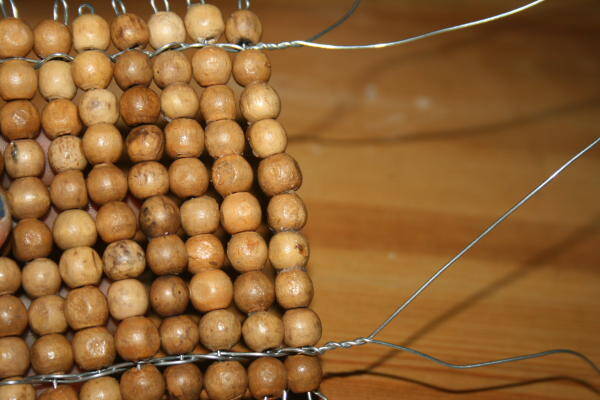
tagliate e ripiegate verso l’interno, nascondendo la chiusura:

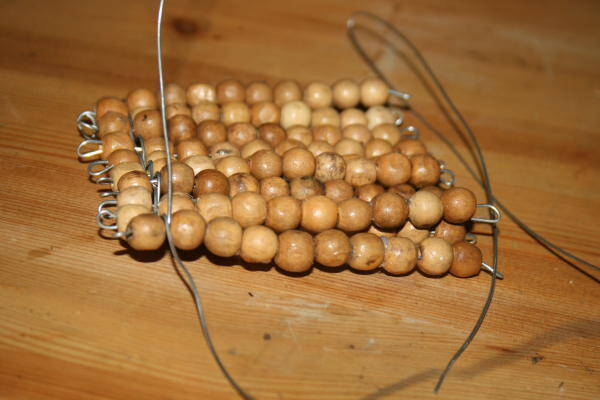
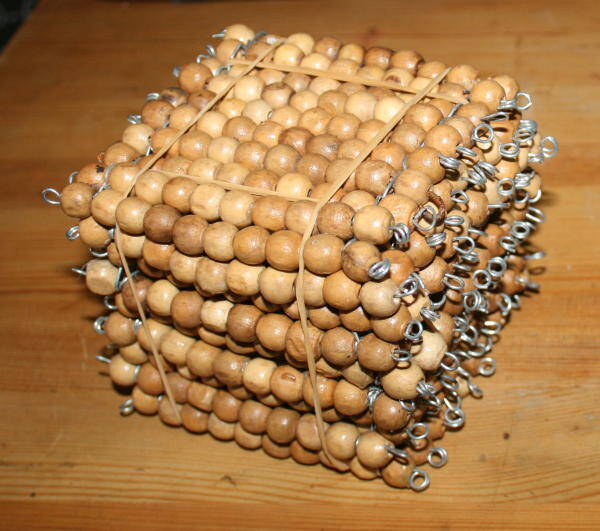
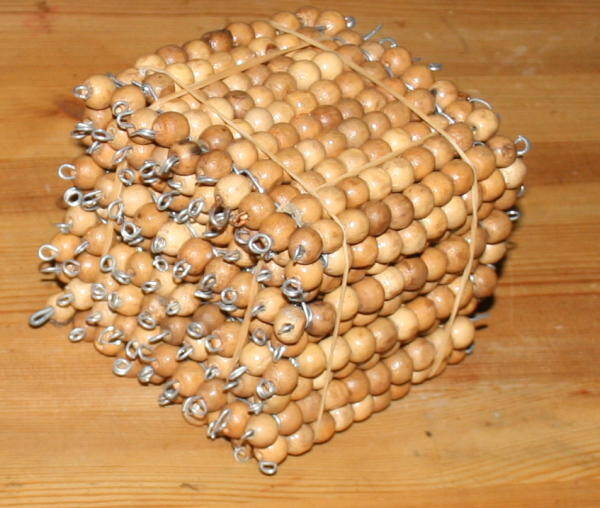
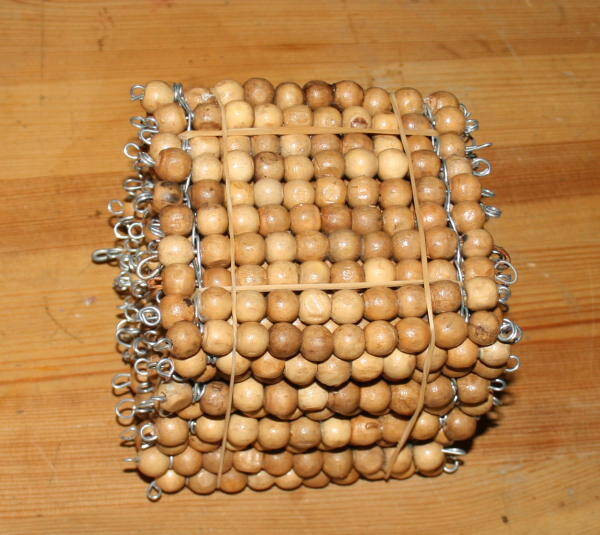
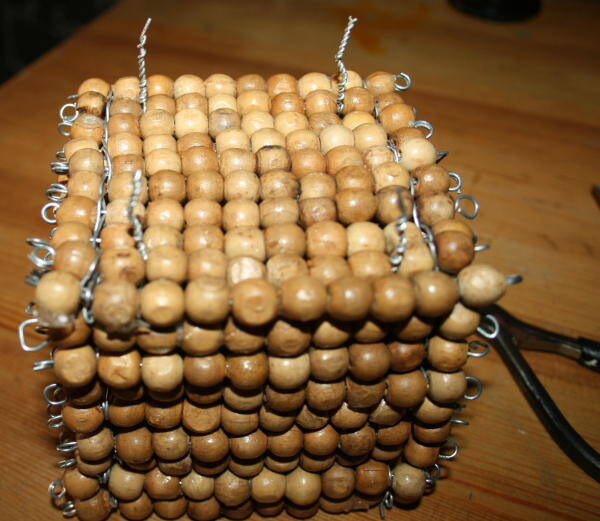
Cubo del migliaio:
Preparate dieci quadrati del cento

Prima possibilità: il modo più semplice di formare il cubo del mille è quello di utilizzare degli elastici. Questa opzione consente di smontare il cubo, e ha il vantaggio di permettere l’esperienza di vedere davvero che 1000 è dieci volte cento, però il cubo risulterà meno stabile mentre si gioca alla banca, ad esempio:


Se invece volete dei cubi più solidi, i quadrati vanno legati col fil di ferro, così:

preparate quattro U di fil di ferro

ed inseritele nel primo quadrato come mostrato nell’immagine.

modellate il fil di ferro

ed inserite il secondo quadrato:


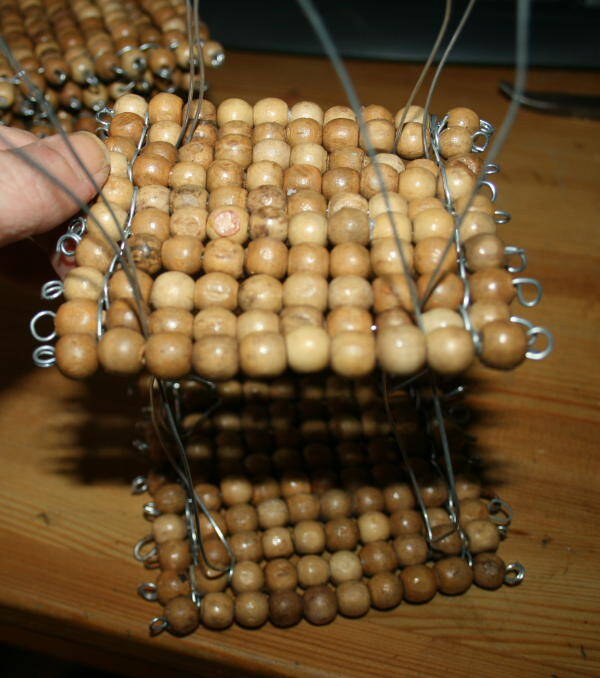


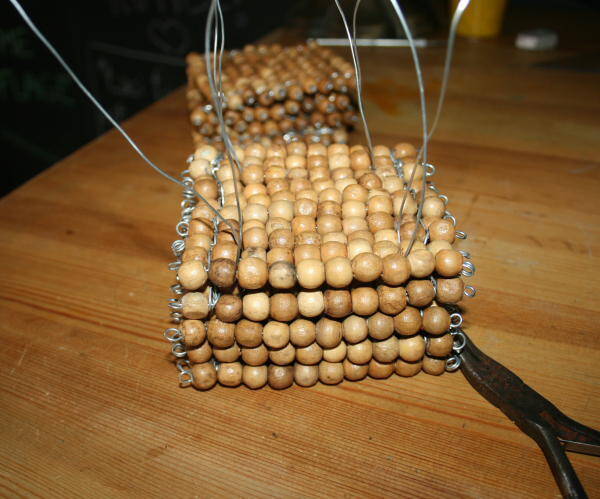
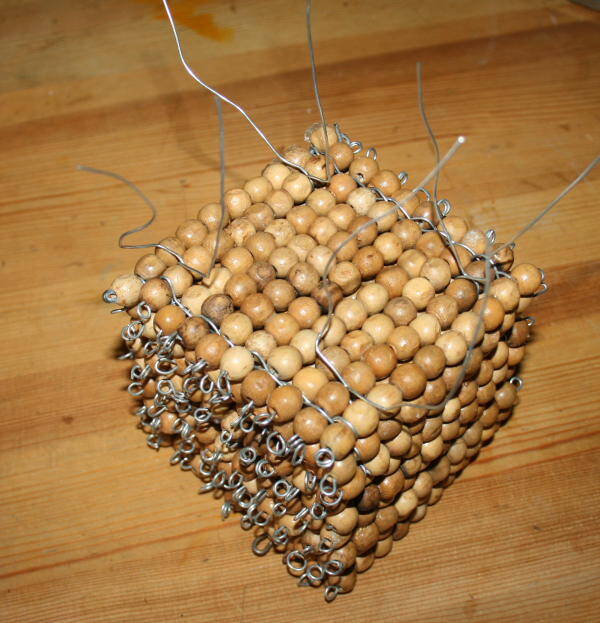

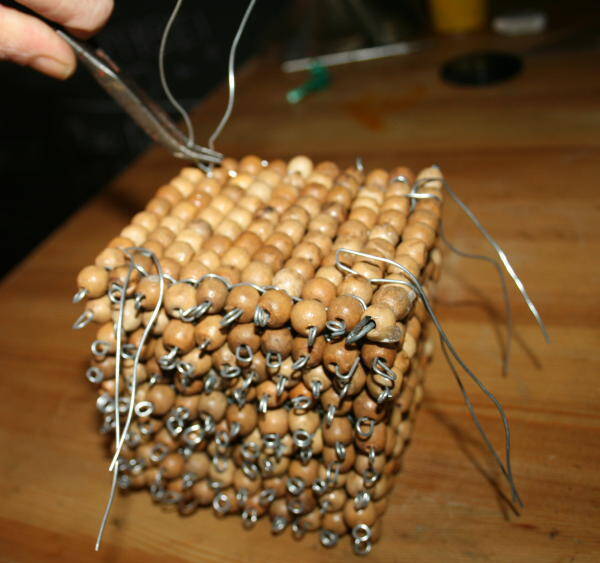
al termine attorcigliate il fil di ferro che avanza,

tagliate

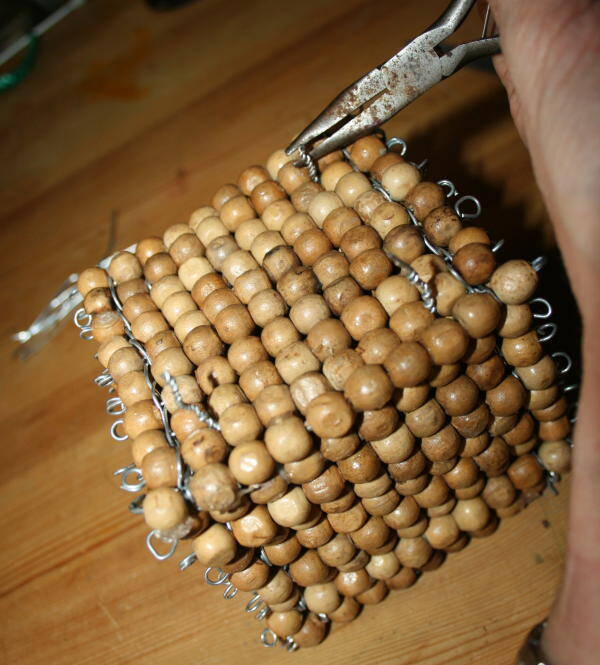

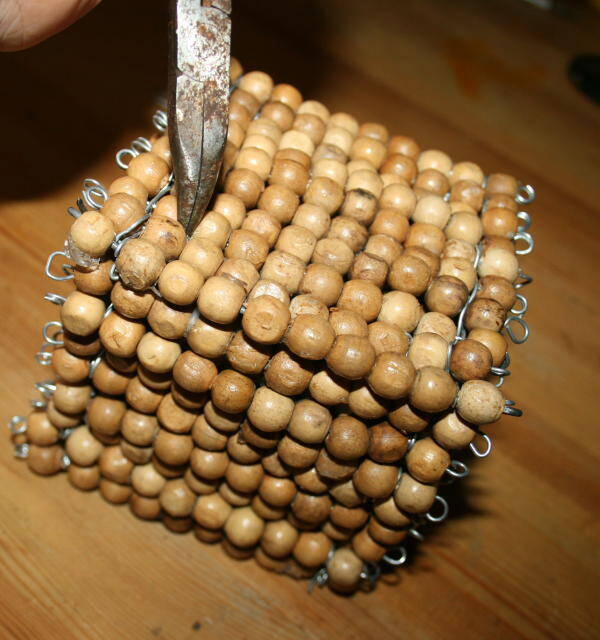
e nascondete all’interno del cubo.


Perle dorate Montessori: presentazione e tutorial
Presentazione dell’unità, la decina e il centinaio: lezione in tre tempi
Ci sono moltissimi esercizi che utilizzano il materiale delle perle dorate; questo è il primo e serve ad introdurre i nomi uno, dieci e cento.
Perle dorate Montessori: presentazione e tutorial
Materiale necessario:
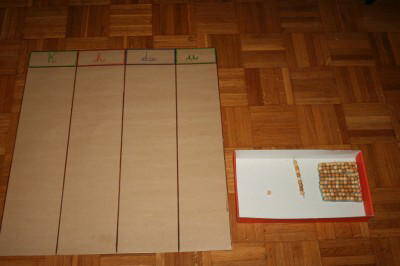
una tabella a colonne per migliaia, centinaia, decine e unità
perle dorate: una unità, una barra della decina, un quadrato delle centinaia
un vassoio
un tappeto
Perle dorate Montessori: presentazione e tutorial
Primo tempo:
1. invitiamo bambino ad unirsi a noi in questo esercizio
2. il bambino può prendere il tappeto e srotolarlo sul pavimento
3. portiamo sul tappeto il materiale, poi ci sediamo accanto al bambino per la presentazione
4. con la presa a tre dita (indice e medio contro pollice) prendiamo l’unità dicendo: “Questa è una unità”.
5. Poi chiediamo al bambino: “Ti piacerebbe tenermi l’unità?”
6. Mettere la perla delle unità nel palmo della mano del bambino, e lasciare che la esamini.
7. quando il bambino ha terminato, rimetterà l’unità nella vostra mano
8. e voi la posizionerete nella tabella, nel riquadro verde delle unità.
9. Prendete ora la barra della decina dicendo: “.Questa è la barra del dieci Ha dieci perle”.
10. Poi chiedete al bambino “Ti piacerebbe tenere in mano la barra del dieci?”
11. Dare la barra al bambino;
12. Il bambino la esamina, conta le perline, e quindi ve la restituisce.
13. posizionate la barra sulla colonna blu delle decine.
14. Ora prendete il quadrato del cento dicendo: “E’ il quadrato del 100, infatti ha 100 perle”
15. poi chiedetegli “Ti piacerebbe tenerla in mano?”
16. e dare il materiale al bambino.
17. Lui la esamina, quindi ve la restituisce,
18. quindi voi la posizionate sulla tabella, nella colonna rossa delle centinaia.
Perle dorate Montessori: presentazione e tutorial
Secondo tempo:
1. Chiedete al bambino “Puoi mostrarmi l’unità?”
2. Ringraziatelo, poi ripetere il processo con la barra di dieci e col quadrato del cento
Perle dorate Montessori: presentazione e tutorial
Terzo tempo:
1. Indicate l’unità e chiedete al bambino “Che cos’è questo?”
2. Ripetete il processo con la barra del dieci e il quadrato del cento.
Se il bambino indica l’oggetto sbagliato o dà il nome sbagliato, chiedetegli di contare le perline. Se poi non corregge il suo errore, è possibile con delicatezza ripetergli il nome dell’oggetto. Per esempio, se il bambino ha detto che la barra del dieci è il quadrato del cento, gli diremo: “Contiamo le perle…”. Quando arriva a dieci, diremo: “Ha dieci perle. E ‘ la barra del dieci”.
Perle dorate Montessori: presentazione e tutorial


Montessori golden beads DIY and presentation. The tutorial to build them on their own with little expense, print version, educational indications and the three period lesson for the presentation of the material to children.


With Montessori golden beads children discover arithmetic as part of the Decimal System:
one (unit) is a point:
the ten is an alignment of ten points on a line:
the hundred is a succession of ten lines (ten beads each) on a square of 100:
the thousand is composed of ten squares put together, which constitute a cube of 1000, which again is a big point:
Ten thousand is formed juxtaposing ten cubes forming, such as ten, a line..
Children receive, with the Montessori golden beads, an authentic orientation in the context of the great mathematical relationships which for them is very important. Often already in the Casa dei Bambini they speak of great numbers and in the Primary school, with the help of this material and their ability to imagine, they can penetrate in broader numerical spaces and eventually find themselves with their concrete unity, that is to say with themselves.
To give children the chance to deal concretely of large numerical spaces, along with the material of Montessori golden beads are offered them,
immediately, also numeric symbols for the units, tens, the hundred and thousand in the form of card Printed (free downloads here: Montessori number cards)
Children put the numbers in connection with the concrete material and learn that they need to just ten symbols: 0 1 2 3 4 5 6 7 8 9, to be able to move and orient in the gigantic world of numbers.
The 1 and 0 are as a frame for the whole.
Hans Magnus Enzensberger has told it so as wonderful in his novel The Number Devil: A Mathematical Adventure:


On the large scale it appeared a Chinese in silk robes and took his seat on the throne of gold.
– Who Is this man? – Robert asked.
– He is the inventor of the zero – whispered Teplotaxl.
– So he is the most powerful? –
– The second -, said his companion – the most powerful of all lives up there, where It ends the staircase, in the clouds –
– Although he is a Chinese? –
– Ah, if I knew! Him, we have not seen even once, but we all honor he. He is the chief of all the devils of the numbers because he invented one. Who knows, maybe it is not even a man, maybe it’s a woman! –
Robert was so impressed that he did not speak for a while. Meanwhile the servants had started serving dinner.
– But these are all cakes! – Said Robert.
– Ssh, not so loud, my boy. Here we only eat cakes, because the cakes are round, and the circle is the most complete of all the figures. Taste –
The one is the beginning, the first bead, followed by the second, the third, the fourth, the fifth, the sixth, the seventh, the eighth, the ninth and the tenth.
Arriving at the tenth, they change all loose pearls with a new one: the ten or 10.
And we continue to rely, and to do that we need another nine tens; we come to the tenth stick and we arrived at 100.
The child understands in this way that we move continuously in a new unit; zero helps to imagine how much space the numbers have just taken.
You can easily guess how the familiarity with the material communicate a profound psychological message to the child: he experiences the extension of arithmetic, but likewise can imagine its development: starting with a point (the egg) the human beingIt grows and occupies more and more space.
Montessori golden beads DIY and presentation
Building on his own material
In summary, for material of Montessori golden beads we mean an allocation of golden beads all the same size. There must be loose for units and strung in the rows of 10 for the tens, the hundreds and a thousands:
1 unit is a bead (point)
1 ten are 10 beads strung a vertical line on a piece of wire or a stick (line)
1 hundred are 10 rows of tens arranged side by side (square)
1 thousand consists of ten hundreds arranged together to form a cube 10x10x10 (point).
This model point / line / point / line is repeated in all the numbers of the decimal system.
It is a rather expensive material, but prepare it on its own is extremely simple, if you are not too perfectionist and if you involve parents in the construction of the material.
I add, for those who think that they can not deal with the construction of the material, a printable version:
which has not definitely the same value from sensory point of view, but which can afford to run with the children a wide range of exercises on the decimal system: golden beads printable.
To have available a large amount of beads all equal to build the material in own I used an old curtain:
and I did as shown in the following images. The work certainly takes time, but it’s worth it and it is very simple. The only advice is to choose a wire not too hard …
Bars of ten:
put ten beads in the wire,
folded the first endpoint
cut the other side and folded:
Square hundred:
prepare 10 bars of ten
cut a piece of wire and fold it to U, so that, folded, it appears along about twice the square of beads:
Place the curve of your U between the first and the second bead of the first bar and modeled like in the image:
approached the second bar and molded again the wire, as done around the first bar:
Proceed the same way for all the other bars:
Now cut a second U of wire and proceed the same way to attach the second side of your square of hundred:
at the end twist the wire left:
cut and fold inward, hiding the closure:
Cube of thousand: prepare ten squares of the hundred
First possibility: the easiest way to form the cube of the thousand is to use rubber bands. This option allows you to disassemble the cube, and has the advantage of allowing the experience to really see that 1000 is ten times hundred, but the cube will be less stable while playing at the bank, for example:
If you want more solid cubes, squares are tied with wire, so:
Montessori golden beads DIY and presentation
Presentation of the unit, the ten and the hundred: three period lesson
There are many exercises that use Montessori golden beads; This is the first and serves to introduce the names of one, ten hundred.
What do you need?
– a table with columns for thousands, hundreds, tens and units
– golden pearls: a unit, a bar of ten, a square of hundreds
– a tray
– a mat
First period:
1. invite children to join us in this exercise
2. the child can take the rug and roll it on the floor
3. carry on the mat material, then we sit next to the child for the presentation
4. with taking three fingers (index and middle fingers against thumb) take the unit saying: “This is a unity.”
5. Then ask the child: “Would you like to keep the unit?”
6. Put the pearl of the units in the palm of the hand of the child, and let him examine it.
7. When your child has finished, it will refer the unit in your hand
8. and you’ll place in the table, in the green box of the unit.
9. Now take the bar of ten saying: “.This is the bar of the ten. It has ten beads.”
10. Then ask the child, “Would you like to hold in your hand the bar of ten? “
11. Give the bar to the child;
12. The child examines it, count the beads, and then returns it to you.
13. place the bar on the blue column of tens.
14. Now take the square of 100, saying: “It ‘s the square of the hundred, it has 100 beads”
15. Then ask “Would you like to hold it?”
16. and give the material to the child.
17. He examines it, then returns it to you,
18. you placed it on the table, in the red column of hundreds.
Second period
1. Ask the child, “Can you show me the unity?”
2. Thank him, then repeat the process with the bar and with the square
Third period
1. Indicate to the child unit and ask “What is this?”
2. Repeat the process with the bar and the square.
If your child shows the wrong item or give the wrong name, ask them to count the beads. If he does not correct his mistake, you can gently repeating the name of the object.