Impronte digitali. Tutorial: libretto fatto a mano con le impronte digitali. Trovo molto interessanti le immagini che si possono creare aggiungendo pochi tratti stilizzati alle impronte digitali; sicuramente i bambini più grandi possono inventare vere meraviglie anche da soli, ma coi più piccoli la proposta si fa più complicata…

…ho pensato questo libretto per loro. Lo consiglio perchè per l’adulto che lo prepara è tempo dedicato alla creatività e ai pensieri felici sul proprio bambino, e per il bambino perchè anche da queste piccole cose può nascere l’amore per i libri e la lettura: facendo leva sulla meraviglia gli diciamo che un libro è una cosa che nasconde sorprese belle e che…le cose non sono le cose. Ed ecco il risultato:

Nelle pagine a sinistra ci sono le impronte digitali colorate, nella pagina a destra, nascosta sotto la carta velina colorata, c’è una paginetta trasparente che contiene i segni che completano la figura: si apre la velina, si gira la pagina trasparente…

… e appare l’immagine completa:


Materiale occorrente:
– fogli A4 bianchi da stampante
– cartoncino colorato
– carta velina colorata
– fogli trasparenti di carta da regalo (quella da fiorista)
– un pennarello nero indelebile
– tempera o pittura da dita in colori vari (io ho usato la pittura per vetrofanie, che una volta asciutta resta lucida e gommosa, e facilita la sovrapposizione del foglio trasparente, che rimane aderente)
– forbici e colla da carta
– nastro adesivo trasparente
– se non siete bravi disegnatori, possono essere utili dei modelli da copiare; i miei, in formato pdf pronti per la stampa, se volete sono qui:
impronte digitali
Come si fa:
Preparate le impronte, fatele asciugare e ritagliatele. Preparate nel frattempo la prima pagina piegando un foglio A4 a metà: la prima facciata sarà la copertina del libretto, e nella prima facciata interna potete incollare le prime impronte.
Per tutte le pagine formate dal foglio A4 piegato a metà, procedete così:
Tagliate a misura un pezzo di carta trasparente e fermatela sulla piegatura della metà col nastro adesivo trasparente, con le dita premete bene, aprite e chiudete più volte questa pagina trasparente aggiunta per fare in modo che si muova agevolmente, poi procedete col disegno:


Incollate al margine destro del foglio bianco la carta velina e ripiegatela in modo che si possa aprire e chiudere, così:

Infine incollate un cartoncino colorato, così:

Piegate il foglio trasparente sul cartoncino (in questo caso giallo) e coprite chiudendo la velina (in questo caso il foglietto rosa):

Per la pagina successiva chiudiamo tutto, la quarta facciata sarà quella dove incolleremo le nuove impronte, poi avremo bisogno un altro foglio A4 piegato a metà, sempre col nastro adesivo trasparente, poi procediamo come sopra: foglio trasparente, disegno, velina e cartoncino…
Per la copertina scegliete del cartoncino e decoratelo a vostro gusto; naturalmente fate in modo che il bambino piccolo capisca facilmente qual è il dritto del libro ed il davanti… la copertina dovrebbe dare questo messaggio.
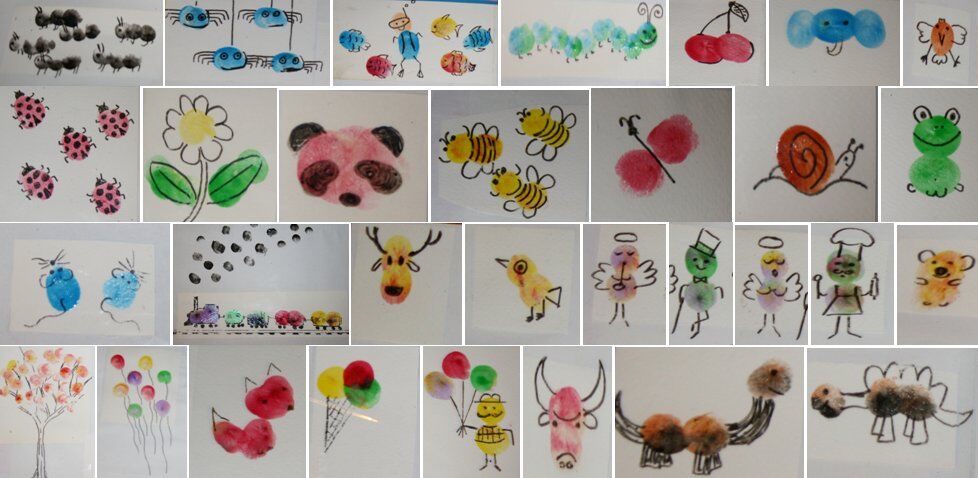
Qui i dettagli delle mie impronte, ma si può fare decisamente di meglio:


I modelli di riferimento li ho trovati qui:
– http://blog.gummylump.com/2011/04/eric-carle-inspired-fingerprint-craft.html
– http://www.thechocolatemuffintree.com/2011/05/ant-art-projects.html
– http://kids4crafts.blogspot.it/2009/03/fingerprint-bug-bookmarks-at-bookmans.html